In this section you can know about :
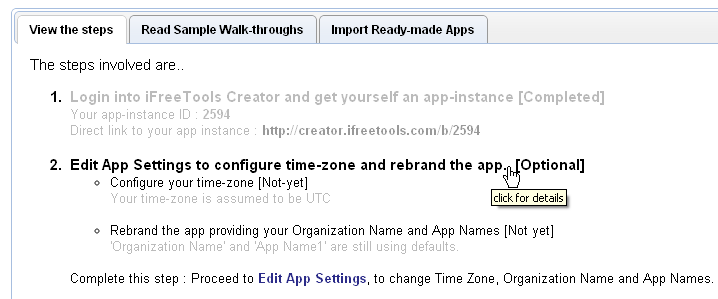
Once you sign up for your new app-instance in iFreeTools Creator, it is recommended to first configure a couple of items in app, most importantly your time-zone. This is prompted as the optional 2nd step in the home page. You can click on the step to view details, as shown below.


Basic changes to App Settings
Once you sign up for your new app-instance in iFreeTools Creator, it is recommended to first configure a couple of items in app, most importantly your time-zone. This is prompted as the optional 2nd step in the home page. You can click on the step to view details, as shown below.
You can directly click on the Edit App Settings link provided in Step 2 on the home page (or you can click on the App Settings link under Admin and in the resulting page you will find an entry for the App Settings record, where you can click on the Edit icon  in the table) to proceed to edit your App Settings.
in the table) to proceed to edit your App Settings.
The initial page to edit the app settings will be like shown below.
Proceed to select your time-zone and change the app names. You can also provide fonts to be used with the app names and logo URL too. You can either show just the logo or can opt to show the app names next to the logo by marking the check-box for that option. Sample changes are shown below.
There are more options related to re-branding and for mapping the app to your sub-domain. You can refer to this blog post for those details.
Once you have made the required changes, click on Save. You will notice that the header portion on the top has changed with new app names and logo.
Play with the fonts available and logos and once you have changed the settings as per your requirements, click on the Home link on the left or on the app name in the header to go back to the home page and proceed to the next step in building your custom database app.
Details of all configuration attributes in App Settings
Server Settings
Time Zone : This will be the default time zone for all the date and date-time fields within the application. If not set, the time zone is assumed to be UTC. It is important to configure this first, as all indexing of date values in database records will be based on this time zone value.
Extends : The application can extend the core Engine or it can extend the native CRM app. When extending Engine the app will have just one default system entity which is for the User. When extending the CRM app, the app-instance will have all CRM entities available in http://crm.ifreetools.com as system entities, which can be extended with new custom entities referring to the native entities. Please note that the system entities CRM entities cannot be customized. So, in case you want to have a customize-able CRM app with entities and attributes as available in iFreeTools CRM, you may want to check out the steps available at http://code.google.com/p/crm-apps-datamodel/
Rebranding
Host Name : This will be the sub-domain in which you would like to map your app-instance to. The process requires that you use Google Apps on that domain. For more details refer to this blog post.
Organization Name : The name of your business entity / organization. This will be listed on the header (top) section of the app.
App Name1 : You can have 2 parts for the app name each having its a different font. App Name1 is the first part of name, the default value for which is iFreeTools. Once changed, it will get reflected in the header and side bars, replacing the name iFreeTools. This will also be used in the listing of apps in My Apps page (link in the top right).
For for App Name1 : The font to be used for the first part of the app name. Default value if not set is Arial.
App Name2 : The second part of the app name, which when changed will be reflected in the header and side bars and in My Apps page. Default value is Creator.
Font for App Name2 : The font to be used for the second part of the app name. Default value if not set is Verdana.
Header Type : There are 3 options to choose from for the type of header, so as to match more with your brand-name / logo / preference. They are the default header, cloud header and full-white header.
Logo URL : The full URL for the logo image. Make sure it is accessible via the internet. You can also use PNG images with transparent background to better merge with one of the header styles
Show Text Names Next To Logo : To specify if the logo alone has to be shown in the header (useful when the logo image contains the app names in the required font/color) or if the app names (App Name1 and App Name2) also have to be shown next to the logo.
Home Page Contents : This is useful when the app-instance is to be mapped to your own domain, as detailed in this blog post. When mapped to the sub-domain, and accessed, the contents provided here will be shown along with the login options in the home page.
Show About Page : To specify if the About page link be shown in the top-right and in the footer. Takes effect for apps mapped on to your sub-domain alone.
About Page Contents : If About page links are to be made visible, the contents provided here will be shown in the About page. Takes effect for apps mapped on to our sub-domain alone.
Show Feedback Page : To specify if the Feedback page link should be shown in the top-right and in the footer. Takes effect for apps mapped on to your sub-domain alone.
Default List View Settings
Page Size : The default page length for all list views. Default is 10.
Show Instant Details : Should instant details be shown below the table listing, when selecting a row in the list views. Default is Enabled.
Search While Typing : Should the search box in the advanced list views start searching in the batch as you are typing. Default is Enabled.
Hide Random Add Buttons : The Add a couple of random records buttons will be visible in the list views to populate sample records within the database. If you do not want this to be displayed, you can hide by checking this option.